
You will need:
Tweezers or something to hold your filigree
A heat source - A butane torch works well, but you can use a gas stove and even a regular lighter
Scouring Pad - I like "3M Between Coats Finishing Pads" that you can get from the paint section of your hardware store.
Optional - Dremel with wire brush or a hand held wire brush
Acrylic Paint - I like a mix of burnt umber and black
Paper Towel to wipe off the paint
First here's a picture of a before and after of what we're trying to achieve

Start by heating the piece with a torch, gas stove or regular lighter. Use the tweezers to hold the filigree piece in the flame until it is completely blackened. You will see it change different colors as you do this. You'll see some various colors but if you hold it to the heat source long enough it will darken.

I don't have the flame going in this picture, didn't want to burn my photo station down, but you get the idea.

This is what it will look like when you're through. Allow the piece to cool. You can quench it in water if you like or just let it cool down.
Next, take the scouring pad and cut it into little one inch or so pieces. This is the perfect size for working with and makes the pad last a lot longer this way.

Clean up the piece with the scouring pad. You will start to see the lighter brass come through.

You can skip this next step if you don't have a dremel with a wire brush attachment or a wire bristled brush . This adds a nice shine to the metal as the wire burnishes the brass. Just go over the whole piece front and back with the dremel or wire brush until it lightens and polishes the brass filigree.

You can leave it like this after you're done but I think it looks a little flat. It is all one color and doesn't have any depth. I tried to get a picture of the piece at this point but the camera is adding shadows where there aren't any.

To make the piece pop we're going to add some depth using the acrylic paint. I was skeptical when I first read about it but it really works. I thought you would be able to tell that paint was used on the piece but you can't. I like to use equal parts of burnt umber and black acrylic paint loosened with a little water. It doesn't seem to matter how much you thin the paint down or if you leave it undiluted it worked both ways for me and watering it down a little conserves your paint for other projects. Brush the paint right onto the piece making sure to get all the nooks and crevices. You can let it sit for about 30 seconds then dab the paint off and wipe after you've dabbed as much as you can get off.

If the piece doesn't look darkened enough, you can repeat with the paint as many times as you need.
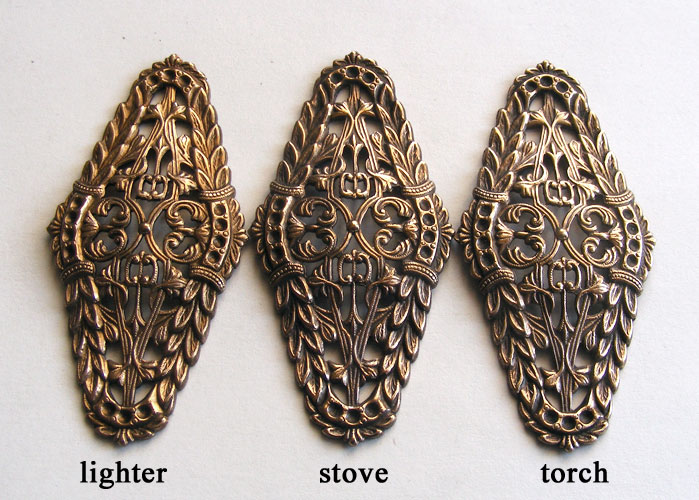
The following picture shows the difference between using a regular lighter, a gas stove and a butane torch. There is virtually no difference between the gas stove and butane torch. The one where I used just the lighter seems a little lighter and I probably could have heated it a second time just to darken it a little. I didn't try it with my propane torch, but I'm sure it would be the same as the butane torch.
In the next example, I have the original raw brass, a piece that I darkened with just paint, and a final piece using the method described above. I like the look of the 3rd but the one darkened with just paint looks pretty too. It's another option to try.

You can leave the pieces as they are but I like to seal them with a product called Permalac. I like the aerosol can in matte. This sprays on very lightly and doesn't make your piece feel like plastic.
Have fun experimenting!
-Sue


