Tuesday, February 15, 2011

How to Patina Raw Brass Filigree Pieces in 5 Easy Steps

In this post I'm going to show you how to darken raw brass filigree pieces in 5 easy steps. Using simple household items I'll show you a fast and non-toxic way to add a patina to your pieces.

You will need:
Tweezers or something to hold your filigree
A heat source - A butane torch works well, but you can use a gas stove and even a regular lighter
Scouring Pad - I like "3M Between Coats Finishing Pads" that you can get from the paint section of your hardware store.
Optional - Dremel with wire brush or a hand held wire brush
Acrylic Paint - I like a mix of burnt umber and black
Paper Towel to wipe off the paint

First here's a picture of a before and after of what we're trying to achieve


Start by heating the piece with a torch, gas stove or regular lighter. Use the tweezers to hold the filigree piece in the flame until it is completely blackened. You will see it change different colors as you do this. You'll see some various colors but if you hold it to the heat source long enough it will darken.


I don't have the flame going in this picture, didn't want to burn my photo station down, but you get the idea.


This is what it will look like when you're through. Allow the piece to cool. You can quench it in water if you like or just let it cool down.

Next, take the scouring pad and cut it into little one inch or so pieces. This is the perfect size for working with and makes the pad last a lot longer this way.


Clean up the piece with the scouring pad. You will start to see the lighter brass come through.


You can skip this next step if you don't have a dremel with a wire brush attachment or a wire bristled brush . This adds a nice shine to the metal as the wire burnishes the brass. Just go over the whole piece front and back with the dremel or wire brush until it lightens and polishes the brass filigree.


You can leave it like this after you're done but I think it looks a little flat. It is all one color and doesn't have any depth. I tried to get a picture of the piece at this point but the camera is adding shadows where there aren't any.


To make the piece pop we're going to add some depth using the acrylic paint. I was skeptical when I first read about it but it really works. I thought you would be able to tell that paint was used on the piece but you can't. I like to use equal parts of burnt umber and black acrylic paint loosened with a little water. It doesn't seem to matter how much you thin the paint down or if you leave it undiluted it worked both ways for me and watering it down a little conserves your paint for other projects.  Brush the paint right onto the piece making sure to get all the nooks and crevices. You can let it sit for about 30 seconds then dab the paint off and wipe after you've dabbed as much as you can get off.


If the piece doesn't look darkened enough, you can repeat with the paint as many times as you need.

The following picture shows the difference between using a regular lighter, a gas stove and a butane torch. There is virtually no difference between the gas stove and butane torch. The one where I used just the lighter seems a little lighter and I probably could have heated it a second time just to darken it a little. I didn't try it with my propane torch, but I'm sure it would be the same as the butane torch.
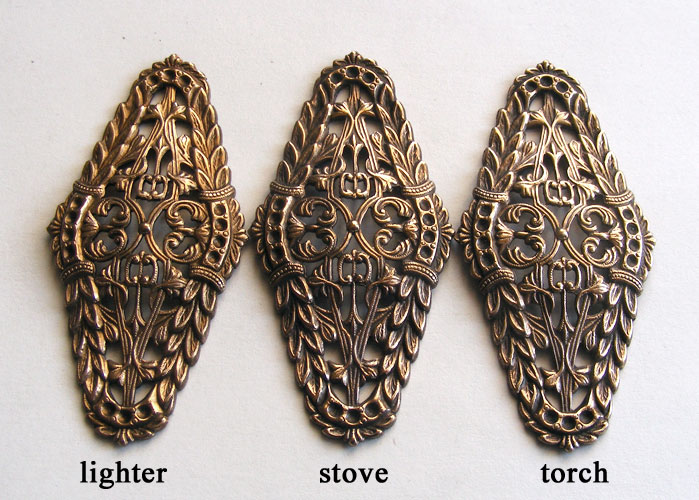


In the next example, I have the original raw brass, a piece that I darkened with just paint, and a final piece using the method described above. I like the look of the 3rd but the one darkened with just paint looks pretty too. It's another option to try.


You can leave the pieces as they are but I like to seal them with a product called Permalac. I like the aerosol can in matte. This sprays on very lightly and doesn't make your piece feel like plastic.

Have fun experimenting!

-Sue

Thursday, February 3, 2011

Basic Wire Skills for Jewelry Making Part 5 Jump Rings

In this post we're going to learn how to make jumprings and how to open and close them properly.

You'll need several tools depending on which method you decide to go with on making jumprings. You'll need a mandrel for both methods and flush cutters to clip the wire after you've made a coil. If you're just going to cut them apart with flush cutters, that's all you'll need. If you're going to saw them apart, you'll also need a jeweler's saw, some blades and some masking tape. I like size 2/0 saw blades, I seem to use them more than anything else.


This concludes the tutorial on basic wire skills.

Have fun practicing!

-Sue

Tuesday, January 18, 2011

Basic Wire Skills for Jewelry Making Part 3 Hand Forged Eyepins

Eyepins are one of the most basic of wire jewelry skills. Learning this one skill will allow you to make a multitude of jewelry pieces.

A lot of other skills are variations of the eye-pin so practice this until you can form them quickly and uniformly.

What You Need:
Practice Wire ( 18 - 20 gauge is good for practice)
Flush Cutters
Round Nose Pliers

Start by cutting the wire flush with your flush cutters, making sure the flush side is on the end of the wire. Next grasp the end of the wire with the round nose pliers.  Make sure the end of the wire if flush with the barrel of the pliers. If not, you will end up with an oblong loop, not a round one.

The size of the loop is determined by how far down the barrel of the pliers you grasp the wire. Start to roll the wire away from you, until a complete loop is formed. If you can’t complete this in one motion, it’s ok to reposition the pliers into a more comfortable position.

Once the complete loop is formed it will be round but it won’t be centered on the rest of the wire. To accomplish this, place the upper barrel of the pliers in the loop and rest the lower barrel against the rest of the wire. Using the lower barrel as the pivot point, rotate the loop until it’s centered on the wire. This will form a slight bend at the base of the loop.


You can leave the eyepin as is or hammer it to make it more sturdy. I find that 20ga or heavier wire works great and is heavy enough that you won't have to worry about the loop coming apart.

You can make your own chain but threading a bead on the pin, and adding another loop on the other end. Make multiples and connect with either jump rings or just the multiples by themselves.

Wednesday, January 12, 2011

Basic Wire Skills for Jewelry Making Part 2 Wire

In this post we're going to take talk about the wire itself.

Gauge
The thickness of wire is measured as gauges. The higher the number the thinner the wire. Some of the most popular gauges to work with are:

14-16 gauges are good gauges for bangles or bracelets.

18 gauge - this is a good firm thickness for jump rings and base components.

20 gauge - can be used to form base components and to make jump rings for lightweight items.

22 - 26 gauges are good for wrapping either a heavier gauges of wire or to wrap beads.

Shapes
Wire comes in different shapes too. The most popular include round, half-round, square, and twisted.

Hardness
You may have heard the terms dead soft, half-hard and hard but weren't sure what they meant.  Here's a breakdown.

Dead soft - This is the most pliable. Wire that is dead soft can be bent very easily. Most copper and brass comes in dead soft. This is my most preferred hardness. You can hammer a piece once you've finished working on it to make it harder. This is called work-hardening.

Half-Hard is a little bit stiffer than dead-soft but not fully hard. If you'd like to make earwires 20ga of half-hard wire will work beautifully.

Full Hard wire is so stiff it's very hard to work with. It's almost impossible to get smooth looking curves with wire that is this stiff.

MaterialsWire is made from different materials. The easiest metal to start with is copper followed by brass.

Copper wire is almost always dead soft and very pliable. It is the wire I recommend learning with.

Brass is good to work with before moving to Sterling Silver because they feel the same to work with. It's a little bit springier than copper. Here's an example of what I mean. When you wind a coil with copper, it almost stays the same size as the mandrel you're wrapping it around. When you wind it with brass or sterling it springs a little bit and it will be a little bit larger in diameter.

Fine Silver is made of pure silver. It is tarnish resistant and very pliable but sometimes too soft.

Sterling Silver is 92.5% silver and 7.5% copper. The copper adds a little bit of strength to sterling but is also the reason why sterling silver tarnishes. Sterling silver is a very popular wire to work with but I would recommend practicing with copper first. Copper is more pliable than brass. 

Gold-filled, which is considered heirloom quality, is a heavy layer of 10k to 14k gold over base metal. The layer is much heavier than for gold-plated and is a way to incorporate gold into your pieces without "breaking the bank."

I hope you learned a little bit about wire that you didn't know before.

-Sue

Monday, January 10, 2011

Basic Wire Skills for Jewelry Making Part 1 Tools

I will be posting a series of tutorials on basic wire skills for jewelry making. Part one will cover the tools required to make wire jewelry. Enjoy!


Let’s start with a brief list of tools that I consider “must-haves.”

Round Nose Pliers
These pliers have rounded tips that taper to a point. You use them to make loops

Long Nose or Flat Nose Pliers
My preference for these are flat nose pliers. They are flat and rectangular but don't come to a tapered point like long nose. You will need two of these so you can get one pair of  flat and one pair of long to see which one you prefer. These will be used to open and close jump rings. You need to twist jump rings open and closed which requires a pair of pliers on each side of the jumpring. These are also used for grasping the wire and I also use them for straightening wire.

Nylon Jaw Pliers
These are not an absolute must but they are nice to have. They are used to straighten wire.

Flush Cutters
There are many types of cutters for cutting metal and wire. The flush cutters have always been my favorite. I like that they are small and can get into tight places.

Small Hammer
I use a very lightweight hammer that I purchased from the scrapbook section of my craft store. It was sold to set eyelets. It has a flat surface on one side and a rounded surface on the other.

Nylon Hammer
Nylon hammers are for straightening metal without marring the surface. When you hammer metal, it becomes hardenened. The more you work with the metal and the more hammering you do the harder the metal becomes. This is called work hardening. You can actually hammer the metal to a point that it because too brittle to work with and will break.

Bench Block
A bench block is a smooth block of steel that you do all your hammering on. A great size to get started is
2 1/2" x 2 1/2"

Jeweler’s Saw & Blades
A jeweler's saw and blades are not absolutely essential for making wire jewelry but having them will allow you to make custom sized jump rings, allow you to make rivets and cut sheet metal and tubing.

Needle Files
Needle files are used for deburring the ends of wire.

Ruler

Various Sized Mandrels
A mandrel is a rod that wire or metal is wrapped around. You can use it to form jump rings, or shape metal. It can be any shape or size. They don't necessarily need to be metal. Chopsticks, crochet hooks, pens and knitting needles make great mandrels for beginners. You will use these to create a coil that will be cut apart to create jump rings.

That's it for the tools. Look for my next posting which will the cover wire.

-Sue

Saturday, January 8, 2011

3 Pieces Combined to Make a Unique Focal for a Necklace

This layering idea uses only 3 pieces. I would use epoxy resin to glue the medallion onto the base piece and wire wrap the top part on.