My daughter is just getting ready to graduate from Paul Mitchell the School so I thought I would create some hair jewelry for her. She can either keep them for herself or sell them to her customers.
I had these plain bobby pins with pads in my stash so the first bobby pins I made were these cute little paper rose ones. I liked how these turned out so much that I started looking to see what else I can turn into hair jewelry.
I decided to glue some findings onto the pad. I used Judkins Diamond Glaze to adhere the finding and added a firepolished bead for some color.
Then I glued some buttons together and made those into cute little bobby pins too.
They were a quick and easy project and something a little bit different to wear in your hair.
Have fun experimenting!
Jewelry making blog from LuxeOrnaments.Etsy.com Get ideas on how to combine components from my shop, how to create unique pieces,step by step projects and tutorials. Also visit my other shop at solivio.etsy.com featuring fine quality gemstone beads in small, affordable parcels.
Showing posts with label brass filigree. Show all posts
Friday, September 9, 2011
Sunday, July 17, 2011
Tip: How To Clean Up Messy Epoxy From Your Pieces After It's Set
This next tip comes from a reader of my blog named Sally.
Sally writes, "I have been gluing jewelery components with 2 part epoxy glue ie cabochon gemstones onto metal and watch cogs etc, but could not get the things glued on without the glue oozing out from underneath.
I can't clean it up when it is wet as whatever I am glueing needs to be left alone to set in place,so I tried using acetone to clean it up when it was set.It didn't work.I got pissed off so I picked up my little electric engraving tool and had a go with that!
Brilliant...I don't have a very hard tip on it,we mainly use it to engrave ID numbers on the plastic of our electrical items for security.If you have good control with this tool it turns the excess glue into powder very easily and will not scratch the metal.It leaves a neat finish very quickly.
Thought this might be of use."
You can find her work on Ebay at myworld.ebay.com/erin11599/
Thanks Sally, I appreciate the tip. I've had trouble with this myself and have had to discard a few pieces. Next time I'll have to try this.
If anybody else has a tip they'd like to share, just send it to me at LuxeOrnaments@gmail.com along with a link and I'll post your tip along with a link to your shop.
Sally writes, "I have been gluing jewelery components with 2 part epoxy glue ie cabochon gemstones onto metal and watch cogs etc, but could not get the things glued on without the glue oozing out from underneath.
I can't clean it up when it is wet as whatever I am glueing needs to be left alone to set in place,so I tried using acetone to clean it up when it was set.It didn't work.I got pissed off so I picked up my little electric engraving tool and had a go with that!
Brilliant...I don't have a very hard tip on it,we mainly use it to engrave ID numbers on the plastic of our electrical items for security.If you have good control with this tool it turns the excess glue into powder very easily and will not scratch the metal.It leaves a neat finish very quickly.
Thought this might be of use."
You can find her work on Ebay at myworld.ebay.com/erin11599/
Thanks Sally, I appreciate the tip. I've had trouble with this myself and have had to discard a few pieces. Next time I'll have to try this.
If anybody else has a tip they'd like to share, just send it to me at LuxeOrnaments@gmail.com along with a link and I'll post your tip along with a link to your shop.
Sunday, June 5, 2011
Joining Filigree Without Glue - Use Wire Instead
For those of you that aren't crazy about the idea of using glue in your jewelry pieces, there is another way to combine pieces of filigree without glue. I'm one of those that worry about using glue. Will the pieces I create last beyond a couple of months or is it going to fall apart? I admit that I'm new to this type of jewelry making and don't have much experience with E6000 glue which is the preferred glue for working with filigree.
The great thing about filigree is that there are plenty of holes in them and you can use wire instead of glue to combine pieces. I used 30 gauge pre-oxidized brass wire that I have available in my shop.
30ga Oxidized Brass Wire Dead Soft
To the naked eye, you can barely see it. The camera seems to pick it out much clearer but when you're looking at the piece, you have to know it's there to pick it out.
Here's an example of 3 pieces that I wired together. It feels very sturdy after I wired them together and I think it looks like an angel. I haven't added beads yet but I will get around to it eventually.
So if you're in love with filigree but want to find a way to combine pieces without glue, try wire instead.
The great thing about filigree is that there are plenty of holes in them and you can use wire instead of glue to combine pieces. I used 30 gauge pre-oxidized brass wire that I have available in my shop.
30ga Oxidized Brass Wire Dead Soft
To the naked eye, you can barely see it. The camera seems to pick it out much clearer but when you're looking at the piece, you have to know it's there to pick it out.
Here's an example of 3 pieces that I wired together. It feels very sturdy after I wired them together and I think it looks like an angel. I haven't added beads yet but I will get around to it eventually.
So if you're in love with filigree but want to find a way to combine pieces without glue, try wire instead.
Saturday, May 7, 2011
Sundial Mixed Metal Necklace
It felt good to get back into my studio and make something again. It's been months since I was able to make anything!
I felt it needed something so I created a frame for it by soldering a large ring in 16ga copper wire. Next I wanted to see if I could join them without soldering the ring to the domed piece. So I cut another piece of brass and cut tabs/prongs into it. I riveted the center of that to a disc I cut out of nickel silver that I textured first. I lifted alternating tabs/prongs and folded them around the domed centerpiece along with the copper ring and it held it in place.
I originally made a narrow rectangular drop but I didn't think the proportions were right when I tried to suspend it from the bottom. I found a pair of earrings that I always thought came out too large and added one of those instead. The proportions looked much better.
I thought of leaving this one as is (raw brass and copper) but decided in the end to oxidize it and I'm glad I did. It toned it down and gave it a beautiful old look.
I've got a lot of ideas swimming around for the next project!
Tuesday, February 15, 2011
How to Patina Raw Brass Filigree Pieces in 5 Easy Steps
In this post I'm going to show you how to darken raw brass filigree pieces in 5 easy steps. Using simple household items I'll show you a fast and non-toxic way to add a patina to your pieces.
You will need:
Tweezers or something to hold your filigree
A heat source - A butane torch works well, but you can use a gas stove and even a regular lighter
Scouring Pad - I like "3M Between Coats Finishing Pads" that you can get from the paint section of your hardware store.
Optional - Dremel with wire brush or a hand held wire brush
Acrylic Paint - I like a mix of burnt umber and black
Paper Towel to wipe off the paint
First here's a picture of a before and after of what we're trying to achieve
Start by heating the piece with a torch, gas stove or regular lighter. Use the tweezers to hold the filigree piece in the flame until it is completely blackened. You will see it change different colors as you do this. You'll see some various colors but if you hold it to the heat source long enough it will darken.
I don't have the flame going in this picture, didn't want to burn my photo station down, but you get the idea.
This is what it will look like when you're through. Allow the piece to cool. You can quench it in water if you like or just let it cool down.
Next, take the scouring pad and cut it into little one inch or so pieces. This is the perfect size for working with and makes the pad last a lot longer this way.
Clean up the piece with the scouring pad. You will start to see the lighter brass come through.
You can skip this next step if you don't have a dremel with a wire brush attachment or a wire bristled brush . This adds a nice shine to the metal as the wire burnishes the brass. Just go over the whole piece front and back with the dremel or wire brush until it lightens and polishes the brass filigree.
You can leave it like this after you're done but I think it looks a little flat. It is all one color and doesn't have any depth. I tried to get a picture of the piece at this point but the camera is adding shadows where there aren't any.
To make the piece pop we're going to add some depth using the acrylic paint. I was skeptical when I first read about it but it really works. I thought you would be able to tell that paint was used on the piece but you can't. I like to use equal parts of burnt umber and black acrylic paint loosened with a little water. It doesn't seem to matter how much you thin the paint down or if you leave it undiluted it worked both ways for me and watering it down a little conserves your paint for other projects. Brush the paint right onto the piece making sure to get all the nooks and crevices. You can let it sit for about 30 seconds then dab the paint off and wipe after you've dabbed as much as you can get off.
If the piece doesn't look darkened enough, you can repeat with the paint as many times as you need.
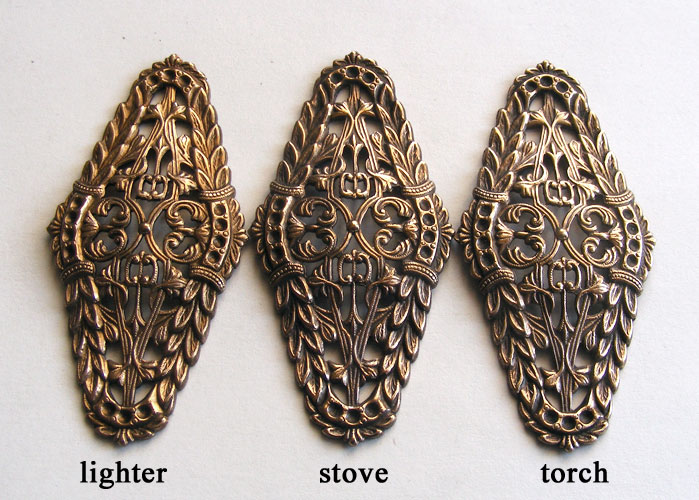
The following picture shows the difference between using a regular lighter, a gas stove and a butane torch. There is virtually no difference between the gas stove and butane torch. The one where I used just the lighter seems a little lighter and I probably could have heated it a second time just to darken it a little. I didn't try it with my propane torch, but I'm sure it would be the same as the butane torch.
In the next example, I have the original raw brass, a piece that I darkened with just paint, and a final piece using the method described above. I like the look of the 3rd but the one darkened with just paint looks pretty too. It's another option to try.
You can leave the pieces as they are but I like to seal them with a product called Permalac. I like the aerosol can in matte. This sprays on very lightly and doesn't make your piece feel like plastic.
Have fun experimenting!
-Sue
You will need:
Tweezers or something to hold your filigree
A heat source - A butane torch works well, but you can use a gas stove and even a regular lighter
Scouring Pad - I like "3M Between Coats Finishing Pads" that you can get from the paint section of your hardware store.
Optional - Dremel with wire brush or a hand held wire brush
Acrylic Paint - I like a mix of burnt umber and black
Paper Towel to wipe off the paint
First here's a picture of a before and after of what we're trying to achieve
Start by heating the piece with a torch, gas stove or regular lighter. Use the tweezers to hold the filigree piece in the flame until it is completely blackened. You will see it change different colors as you do this. You'll see some various colors but if you hold it to the heat source long enough it will darken.
I don't have the flame going in this picture, didn't want to burn my photo station down, but you get the idea.
This is what it will look like when you're through. Allow the piece to cool. You can quench it in water if you like or just let it cool down.
Next, take the scouring pad and cut it into little one inch or so pieces. This is the perfect size for working with and makes the pad last a lot longer this way.
Clean up the piece with the scouring pad. You will start to see the lighter brass come through.
You can skip this next step if you don't have a dremel with a wire brush attachment or a wire bristled brush . This adds a nice shine to the metal as the wire burnishes the brass. Just go over the whole piece front and back with the dremel or wire brush until it lightens and polishes the brass filigree.
You can leave it like this after you're done but I think it looks a little flat. It is all one color and doesn't have any depth. I tried to get a picture of the piece at this point but the camera is adding shadows where there aren't any.
To make the piece pop we're going to add some depth using the acrylic paint. I was skeptical when I first read about it but it really works. I thought you would be able to tell that paint was used on the piece but you can't. I like to use equal parts of burnt umber and black acrylic paint loosened with a little water. It doesn't seem to matter how much you thin the paint down or if you leave it undiluted it worked both ways for me and watering it down a little conserves your paint for other projects. Brush the paint right onto the piece making sure to get all the nooks and crevices. You can let it sit for about 30 seconds then dab the paint off and wipe after you've dabbed as much as you can get off.
If the piece doesn't look darkened enough, you can repeat with the paint as many times as you need.
The following picture shows the difference between using a regular lighter, a gas stove and a butane torch. There is virtually no difference between the gas stove and butane torch. The one where I used just the lighter seems a little lighter and I probably could have heated it a second time just to darken it a little. I didn't try it with my propane torch, but I'm sure it would be the same as the butane torch.
In the next example, I have the original raw brass, a piece that I darkened with just paint, and a final piece using the method described above. I like the look of the 3rd but the one darkened with just paint looks pretty too. It's another option to try.
You can leave the pieces as they are but I like to seal them with a product called Permalac. I like the aerosol can in matte. This sprays on very lightly and doesn't make your piece feel like plastic.
Have fun experimenting!
-Sue
Subscribe to:
Posts (Atom)